A few days ago I ended up on a website (I forget where) which featured a very nice and subtle square tiling on the background of the page. Now, this is in itself is not astonishing, plenty of folks and businesses out there will present you with all sorts of tessellated backgrounds. However, it got me thinking about doing some tiling background myself. Not because I particularly need one (it certainly wouldn’t look right on this blog), but just to experiment. To make things slightly more interesting I opted for another shape: the hexagon.
A hexagon is a polygon with six edges and six vertices. The regular hexagon is equilateral and all internal angles are 120°. It is also one of three polygons with which you can create a regular tiling. That is, using only hexagons you can fill a plane without any gaps or overlaps. The other two regular shapes with which this can be done are the square and the equilateral triangle.
Drawing a hexagon with PIL
The first step towards tiling hexagons is to create a single hexagon. The first stop when it comes to images in Python is the Python Imaging Library (better known as PIL). Using this library and knowledge of basic math, the following code will generate a single hexagon:
1 2 3 4 5 6 7 8 9 10 11 12 13 14 15 16 17 | import math
from PIL import Image, ImageDraw
def hexagon_generator(edge_length, offset):
"""Generator for coordinates in a hexagon."""
x, y = offset
for angle in range(0, 360, 60):
x += math.cos(math.radians(angle)) * edge_length
y += math.sin(math.radians(angle)) * edge_length
yield x, y
def main():
image = Image.new('RGB', (100, 100), 'white')
draw = ImageDraw.Draw(image)
hexagon = hexagon_generator(40, offset=(30, 15))
draw.polygon(list(hexagon), outline='black', fill='red')
image.show()
|
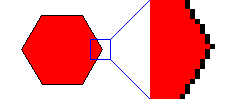
The hexagon drawn with PIL.
What this does, step by step:
- We create a 100x100 pixel image in RGB color mode.
- We initialize a drawing layer on this, and start drawing a polygon.
- The
hexagon_generator()function yields six coordinates. Starting from the top-left vertex it calculates the next coordinate-pair and yields this. With the sixth iteration, the top-left vertex is yielded and the polygon is closed. - We draw the polygon in red with a black outline, and then show it using whatever platform bindings are present. Alternatively the image can be saved and then opened with an external viewer.
However, as shown, the resulting image is not very visually appealing. The slanted edges of the hexagon are not smoothed, anti-aliased, and drawing multiple hexagons will cause gaps and overlaps because our hexagons are not on exact pixel boundaries. This is problematic and needs a solution. Thankfully, one exists.
Drawing a hexagon with aggdraw
Aggdraw is an extension to PIL based on the Anti-Grain Geometry library which provides anti-aliasing and alpha compositing. After installing aggdraw [1] and making a few minor adjustments to the script, the resulting hexagon is perfectly smooth along the edges:
1 2 3 4 5 6 7 8 9 10 11 12 13 14 15 16 17 18 19 20 | import math
from PIL import Image
from aggdraw import Draw, Brush, Pen
def hexagon_generator(edge_length, offset):
"""Generator for coordinates in a hexagon."""
x, y = offset
for angle in range(0, 360, 60):
x += math.cos(math.radians(angle)) * edge_length
y += math.sin(math.radians(angle)) * edge_length
yield x
yield y
def main():
image = Image.new('RGB', (100, 100), 'white')
draw = Draw(image)
hexagon = hexagon_generator(40, offset=(30, 15))
draw.polygon(list(hexagon), Pen('black'), Brush('red'))
draw.flush()
image.show()
|
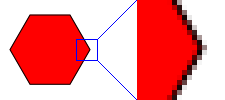
The same hexagon as before, drawn with PIL+aggdraw.
The highlighted changes:
- Importing the necessary aggdraw parts: Draw, Pen and Brush classes;
- The aggdraw
polygon()method requires a flattened list of coordinates rather than 2-tuples that are allowed by PIL; - The drawing layer is created using aggdraw than PIL’s ImageDraw;
- The polygon is colored using Pen and Brush classes (which may come in any order);
- Importantly, the draw instance must be flushed, or the image will remain blank.
Drawing tiled hexagons
Now that we can draw a single aesthetically pleasing hexagon, the next step is to fill a grid with them. There are multiple ways of achieving this, one of them is adding some functionality to the hexagon generator where instead of providing it with a pixel offset, we provide it with the row and column we want the hexagon for:
1 2 3 4 5 6 7 8 9 10 11 12 13 14 15 16 17 18 19 20 21 | class HexagonGenerator(object):
"""Returns a hexagon generator for hexagons of the specified size."""
def __init__(self, edge_length):
self.edge_length = edge_length
@property
def col_width(self):
return self.edge_length * 3
@property
def row_height(self):
return math.sin(math.pi / 3) * self.edge_length
def __call__(self, row, col):
x = (col + 0.5 * (row % 2)) * self.col_width
y = row * self.row_height
for angle in range(0, 360, 60):
x += math.cos(math.radians(angle)) * self.edge_length
y += math.sin(math.radians(angle)) * self.edge_length
yield x
yield y
|
A row has hexagons all at the exact same height, and every odd-numbered row is shifted one hexagon-width to the right. This makes our rows very sparsely filled, and rows are only half a hexagon tall. While this might seem undesirable because it makes a [3 colum] x [3 row] configuration 3.4 times wider than tall, it makes things a lot easier when we get to the point of preparing the edges of the image for tiled use.
1 2 3 4 5 6 7 8 9 10 11 | def main():
image = Image.new('RGB', (250, 250), 'white')
draw = Draw(image)
hexagon_generator = HexagonGenerator(40)
for row in range(7):
color = row * 10, row * 20, row * 30
for col in range(2):
hexagon = hexagon_generator(row, col)
draw.polygon(list(hexagon), Brush(color))
draw.flush()
image.show()
|
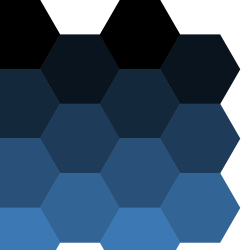
The resulting array of hexagons.
To put more than a handful hexagons on screen, we need a slightly bigger canvas, in this case 250px squared. We initiate the class HexagonGenerator with the edge size of our hexagons, and then iterate through seven rows and of each two hexagons. We draw these using the instantiated hexagon generator, similarly to how we previously used the hexagon_generator() function.
To be able to see the individual hexagons, each rows is drawn in an increasingly lighter shade of blue. The result of this code is included to the side.
Further steps
After this short session we can now fill a canvas with a neatly arranged grid of hexagons. Both the image and the hexagons themselves can be of any size, and because of anti-aliasing provided by aggdraw, there are no grainy edges to be seen anywhere.
However, a number of things are still to be improved:
- Automatic canvas sizing - the number of repetitions should govern the output size;
- Allow tiling by having edges ‘connect’ to each other, both color and shape;
- It would be nice to have configurable, flexible random colors to fill the tiling with.
These issues will be resolved and explained in the next post.
Footnotes
| [1] | Installing aggdraw turned out to be a small challenge. The C++-extension in the version available on PyPI seems to have a problem compiling on 64-bit systems. What worked for me (but may cause subtle problems) was prefixing CFLAGS to the build command. CFLAGS="-fpermissive" python setup.py install in my env/build directory after having pip install aggdraw fail. |
Comments
comments powered by Disqus