In part one, we covered the drawing of smooth, anti-aliased hexagons in a grid-like fashion. In this post, we will extend that beginning into a program to draw hexagon fills that can be used for a tiled background. The key improvements that were identified in the previous post:
- Canvas sizing and shape wrapping
- Color wrapping around the edges
- Configurable, mostly random coloring
Canvas sizing and shape wrapping
To be able to use the generated image as a tiled background, the shapes must wrap from left to right. That is, if a row contains a hexagon that is cut off on the left edge, the portion that was cut off should be the end of that row on the right edge, and vice-versa.
This is a complex way of saying that the width of the image must be an exact multiple of the pattern size. The pattern in this case is the smallest shape from which a repeating pattern can be constructed. For the hexagons generator we have, this pattern is one column wide and two rows tall.
Because the pattern size is very closely coupled to the dimensions of the hexagon, we make this information available as a property of class HexagonGenerator. We then modify the existing script to draw only outlines so we can see how things are constructed:
1 2 3 4 5 6 7 8 9 10 11 12 13 14 15 16 17 18 19 20 | class HexagonGenerator(object):
# Rest of class as previously defined
@property
def pattern_size(self):
return self.col_width, self.row_height * 2
def main():
hexagon_generator = HexagonGenerator(40)
width, height = hexagon_generator.pattern_size
image = Image.new('RGB', (int(width * 2), int(height * 3)), 'white')
draw = Draw(image)
draw.rectangle((0, 0, width, height), Brush('black', opacity=64))
colors = (('red', 'blue'), ('green', 'purple'))
for row in range(5):
for column in range(3):
hexagon = hexagon_generator(row, column)
color = colors[row % 2][column % 2]
draw.polygon(list(hexagon), Pen(color, width=3))
draw.flush()
image.show()
|

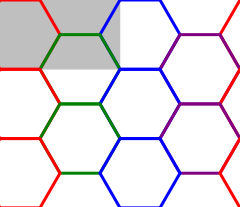
Resulting hexagons. The gray rectangle indicates the pattern size.
The hexagon generator is initialized to generate hexagons of a 40px edge length. The width and height of the pattern are then used to create a canvas that is two patterns wide and three tall. This makes for a reasonably square canvas where we can demonstrate a few things.
First, a plain rectangle indicating the pattern size is drawn. Then, five rows of three columns each are drawn. The number of (full) rows we can fit is twice the number of patterns, minus one. This is due to the rows only shifting up half a pattern size at a time. The hexagons in the even rows are then drawn in alternating red and blue, those in the odd rows in green and purple.
Iteration variations
What becomes clear upon inspection of the result is how the overlapping lines are drawn. The first hexagon, drawn in red, has its lower right line drawn over in green by the next rows’ hexagon. The exact order in which this occurs can be influenced by changing the order in which iteration happens:
- Sequential row -> column iteration
- Sequential column -> row iteration
- Random row -> column iteration
- Iteration that draws in inward/outward hexagonal patterns
Generating these different iteration patterns is outside the scope of this post, but may prove an interesting thing to play with for certain projects.
Delegating image creation
In the previous examples we’ve done a fair bit of hand-waving when it comes to determining the size of the canvas. By now, with the canvas creation becoming more involved, it makes sense to take another good look at the requirements and create a new function that satisfies these.
The function should accept a 2-tuple that contains the size of the pattern, and the desired number of repetitions. From this, a canvas should be created that is as close to square as possible. The returned value shall be an instance of class Image:
1 2 3 4 5 6 | def create_canvas(pattern_size, repetitions):
"""Returns an Image that fits the given number of pattern repetitions."""
width, height = pattern_size
canvas_width = int(repetitions * width)
canvas_height = int(round(canvas_width / height) * height)
return Image.new('RGB', (canvas_width, canvas_height), 'white')
|
For this use-case, the pattern will always be wider than taller, so the canvas size is determined by the number of horizontal repetitions. Once that is determined, the height is chosen as the number of repetitions that brings the resulting canvas closest to a square.
Extending the function to work with patterns of different aspect ratio is left as an exercise for the reader.
Color wrapping around the image edges
To demonstrate correct color wrapping, we first have to change the coloring process a bit, introducing a function to generate random colors. The following will produce random, distinct colors across most of the RGB spectrum. The cutoff points for individual channel level are chosen so that we don’t end up with too pale or dark colors, but otherwise it’s pretty straightforward:
1 2 3 4 | def random_color():
"""Returns a random RGB color from a space of 343 options."""
levels = range(32, 256, 32)
return tuple(random.choice(levels) for _ in range(3))
|
We can then use these colors for use in Pen or Brush classes. Note that the return value must be a tuple. A list of three values will not be accepted as a color by either class and the default black is used.
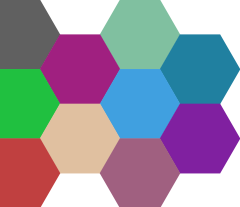
Using this random color function we get some.. colorful results:
1 2 3 4 5 6 7 8 9 10 | def main(repetitions=2):
hexagon = HexagonGenerator(40)
image = create_canvas(hexagon.pattern_size, repetitions)
draw = Draw(image)
for row in range(5):
for column in range(repetitions):
draw.polygon(list(hexagon(row, column)), Brush(random_color()))
draw.flush()
image.show()
image.save('hexagon_agg_tile.png')
|

Result of our random coloring
The code to generate the tiling remains roughly the same, but now uses the create_canvas() function that we defined in the previous section. The number of rows to draw is still very much a known value, something we shall deal with first.
How many rows to fill a canvas
Put simply, we need a convenience function to determine the number of rows that fit the created canvas. The canvas creation function knows the number of pattern repetitions that fit, from which we can derive the number of rows needed to fill the image. However, it would add a secondary purpose to that function, which is not ideal. Adding a method to the class HexagonGenerator that returns how many rows fit a given dimension seems like the way forward:
1 2 3 4 5 | class HexagonGenerator(object):
# Rest of class as previously defined
def rows(self, canvas_height):
"""Returns the number of rows required to fill the canvas height."""
return int(math.ceil(canvas_height / self.row_height))
|
The number of rows returned is rounded up, to make up for the integer truncation that happens in the create_canvas() function. As such, the number returned is the number of rows required to fill the image without leaving a single open line.
Wrapping stage one: horizontal
To create an image that can be tiled, the empty sections along the left edge need to be of the same colors as the empty sections along the right. And the same goes for the top and bottom. Obviously, we cannot do this by simply relying on luck when we get a random color.
The simplest solution is to generate a full row’s worth of colors ahead of time. Coloring the hexagons in the row is then a matter of iterating over this list of colors, painting hexagons from left to right. After all colors in the list are used, the hexagon that sits on (or over) the right edge is drawn using the color from the 0th position of the list. This way, the two will always match up:
colors = [random_color() for _ in range(repetitions)]
for column, color in enumerate(colors):
  draw.polygon(list(hexagon(row, column)), Brush(color))
draw.polygon(list(hexagon(row, repetitions)), Brush(colors[0]))
The special case can be made part of the general loop if the colors list is not enumerated but indexed, and the number of columns iterated is one extra. The index on the colors list has to be kept within bounds, which is where the modulo operator comes in handy:
colors = [random_color() for _ in range(repetitions)]
for column in range(repetitions + 1):
  color = colors[column % repetitions]
  draw.polygon(list(hexagon(row, column)), Brush(color))
Wrapping stage two: vertical
The vertical wrapping is conceptually similar to the horizontal wrapping, but requires a slightly different approach. After performing the number of iterations as instructed by the HexagonGenerator.rows() method, the last row consists of polygons that are cut in half by the lower edge of the canvas. Because of Python’s variable scope behavior [1], the list of colors that was created and used for that last row is still available after the main drawing loop has concluded.
All we need to do to achieve color wrapping is to draw hexagons along the top half-row, which is easily done by proving row=-1.
Putting it all together
The final version of the script combines the code from the previous three sections to create a tileable covering of the canvas:
1 2 3 4 5 6 7 8 9 10 11 12 13 | def main(repetitions=2):
hexagon = HexagonGenerator(40)
image = create_canvas(hexagon.pattern_size, repetitions)
draw = Draw(image)
for row in range(hexagon.rows(image.size[1])):
colors = [random_color() for _ in range(repetitions)]
for column in range(repetitions + 1):
color = colors[column % repetitions]
draw.polygon(list(hexagon(row, column)), Brush(color))
for column, color in enumerate(colors):
draw.polygon(list(hexagon(-1, column)), Brush(color))
draw.flush()
image.show()
|
Results!

The fruits of our labor, a tiling with no discernible seam.
The image shown just above here is the result of a slightly modified version of the last version of our drawing script. There are 5 pattern repetitions of hexagons with an edge size of 5px each. The resulting base image is 75x77 pixels, and this is repeated twice vertically and nine times horizontally. The result of that tiling makes for a final image that is 675x154 pixels large. Because of the fairly small pattern size, the repetition is easily spotted, but even so there are no clear seams.
The random coloring for this image will be part for a next post, as this one is getting on the long side already. A full copy of the code to generate hexagon tilings is available as a Gist. Licensing wise I consider this to be a contribution to the public domain, but I would like to hear about it if this has been useful or interesting for you in any way.
Footnotes
| [1] | The creative use of Python’s variable scoping here is grounded in the lack of block scope, making the variables defined in a for-block available to the code that follows it. If the preceding loop is not executed at all (because of an empty iterator), a NameError will be raised. This will happen only for an image of zero size, which is not something we expect to create. |
Comments
comments powered by Disqus